ibrahimbutt/direwolf-arch-rice
{ "createdAt": "2017-08-14T19:21:43Z", "defaultBranch": "master", "description": "🐺🍚 A guide to replicating my riced Arch Linux set-up.", "fullName": "ibrahimbutt/direwolf-arch-rice", "homepage": "", "language": "Shell", "name": "direwolf-arch-rice", "pushedAt": "2021-09-30T02:09:36Z", "stargazersCount": 980, "topics": [ "arch", "arch-linux", "dmenu", "i3", "i3wm", "linux", "linux-desktop", "polybar", "pywal", "ranger", "rice", "ricing", "urxvt" ], "updatedAt": "2025-11-17T09:41:15Z", "url": "https://github.com/ibrahimbutt/direwolf-arch-rice"}Ricing Arch Linux
Section titled “Ricing Arch Linux”
Foreword
Section titled “Foreword”Who is this guide for?
Section titled “Who is this guide for?”Those who are interested in ricing or would like to know what it is, whether they are experienced Linux users or complete beginners.
Those who want control over the way their desktop environment [DE] looks, far beyond the offerings of Windows and OS X.
Those who dislike extra/unneeded features cluttering their DE. With ricing and Linux in general, you can keep what you want/need and remove everything else. This is especially helpful for older systems.
Hold up… “ricing”?
Section titled “Hold up… “ricing”?”If the term confuses you, you aren’t alone. You’re probably thinking, what does rice have to do with computers, at all? Below is the definition of ricing taken from r/unixporn:
“Rice” is a word that is commonly used to refer to making visual improvements and customizations on one’s desktop. It was inherited from the practice of customizing cheap Asian import cars to make them appear to be faster than they actually were - which was also known as “ricing”. Here on /r/unixporn, the word is accepted by the majority of the community and is used sparingly to refer to a visually attractive desktop upgraded beyond the default.
What You’ll Be Creating Today
Section titled “What You’ll Be Creating Today”
There’s not a lot going on, right? Yeah, that was the whole point. I mostly use Firefox and Vim. I don’t need much. It’s my personal setup and what I’m using at the time of writing. If you want more, this guide will teach you the basics and provide a set-up to ‘improve’ on with your own needs in mind.
Visit r/unixporn to see what others have created.
Overview of Setup
Section titled “Overview of Setup”Time Commitment
Section titled “Time Commitment”You should be done in an hour, however, it may take longer depending on your internet connection.
Arch Linux
Section titled “Arch Linux”In a nutshell, Arch is an independently developed general-purpose GNU/Linux distribution. The main reason you would choose this over other distributions is that it comes with the bare minimum and zero bloat. This allows you to have a lean system from the beginning.
If you’ve heard of Arch, you may have heard the installation isn’t so simple. You may even find it to put you off. Don’t worry about that. Anarchy Linux makes installation easy. The only difference is that Anarchy Linux has an installer.
Installing Arch manually is outside the scope of this guide. If you prefer to install it manually, visit the installation guide. Otherwise, use Anarchy Linux.
Tip: To save time, download Arch/Anarchy Linux while you read on.
Window Manager
Section titled “Window Manager”We will be using i3 as our WM. It is a dynamic window tiling manager. This means, when a window is opened, it takes up the whole desktop. When you open another window, the new and existing one will be resized to be equal. This happens each time you open a new window. Mathematically, when two windows are open, each will take one-half of screen space. When a third window is opened, they’ll each take one-third of screen space and so on. The same applies if they are opened vertically. Windows can be resized, arranged in tabs and stacks. They can also be floated, meaning you can move and resize windows how you would in Windows and OS X.

You can read the usage documentation here.
Package Installer
Section titled “Package Installer”Besides Pacman, the default package installer shipped with Arch. We will be installing Yay:
Yay, yet another yogurt. Pacman wrapper and AUR helper written in go.
All you need to know for now is, it saves you a lot of time in the long-term. Without it, you would need to go through the manual build process for each package that can’t be installed through Pacman. This is one of those things you wish you knew when you were starting out.
Terminal Emulator
Section titled “Terminal Emulator”We’ll be using rxvt-unicode, also known as urxvt. It’s fast, lightweight and highly customizable. Furthermore, Wal can automatically apply a generated colorscheme to urxvt.
Status Bar
Section titled “Status Bar”The Polybar repository tells it best:
A fast and easy-to-use tool for creating status bars.
Polybar aims to help users build beautiful and highly customizable status bars for their desktop environment, without the need of having a black belt in shell scripting. Here are a few screenshots showing you what it can look like:
Polybar is modular. Meaning, if you want to see what workspace you’re on and which ones have an open window, you add a module for said functionality. If you want to see the time and date, you add another module. The one I have configured and is included in this guide is very minimal, since I don’t need other modules. For examples with more modules, visit the Polybar repository and/or u/unixporn with a restrcited search to see what can be achieved.
Application Launcher/Dynamic Menu and File Manager
Section titled “Application Launcher/Dynamic Menu and File Manager”Personally, I love application launchers. It makes your workflow noticeably more efficient, than if you were to go onto a list of applications and click on the one you need to open. We will be going with dmenu. A simple, fast and lightweight dynamic menu.
Ranger is a Vim inspired CLI file-manager and is very quick to use once you get the hang of it. Besides, it can match your colour scheme. More on that later.

Note: i3 by default does not have a feature where you can see all your applications.
Themeing
Section titled “Themeing”Two ways in which the colour scheme can be altered is through the .Xresources file and Wal. We will be using the Python version of Wal, called Pywal.
Taken from the Arch Wiki:
Xresources is a user-level configuration dotfile, typically located at ~/.Xresources. It can be used to set X resources, which are configuration parameters for X client applications.
They can do many operations, including:
- defining terminal colours
- configuring terminal preferences
- setting DPI, antialiasing, hinting and other X font settings …
Taken from the Pywal repository:
walis a script that takes an image (or a directory of images), generates a colour scheme (usingimagemagick) and then changes all of your open terminal’s colours to the new colour scheme on the fly. wal then caches each generated colour scheme so that cycling through wallpapers while changing colour schemes is instantaneous.
walalso merges the new colour scheme into the Xresources database so that programs on your system such asRofiori3use the new colours automatically.walfinally exports the colors into various formats so that you can use the colours in web pages, scripts, other programs etc.
Polybar can also use the colour scheme generated by Wal if you configure it to.
We will be using Overpass by Red Hat. It comes with 8 weight variants and a monospaced version, named Overpass Mono, which you can see in the status bar.

Neofetch
Section titled “Neofetch”Taken from the Neofetch repository:
Neofetch is a CLI system information tool written in BASH. Neofetch displays information about your system next to an image, your OS logo, or any ASCII file of your choice. The main purpose of Neofetch is to be used in screenshots to show other users what OS/Distro you’re running, what Theme/Icons you’re using etc.
Although not necessary, I will be showing you how to work with Neofetch since it’s so popular.
Text Editor
Section titled “Text Editor”Throughout this guide, we’ll be using Vim, a powerful yet lightweight text editor. For those who don’t know how to use it, I’ll be including the commands needed to follow this guide.
Lets Get Cooking!
Section titled “Lets Get Cooking!”Getting Started
Section titled “Getting Started”Firstly, you need to install Arch. If you’re doing the manual installation, the Arch guide will walk you through formatting your USB. For those using Anarchy Linux, see below on how to make a bootable USB depending on the OS you are currently using.
Windows
Section titled “Windows”Download Rufus and open it up. Select your USB and down in Format Options, press the button with the disk/hard-drive and select the ISO.
Rufus should now match what’s in the below screenshot, with the exception of the “Dvice”, “New volume label” and the ISO image information at the very bottom.

When you’re ready, press start. If are asked for permission to download additional files, allow it.
Download and use Etcher. Select the ISO file and USB, then hit Flash.

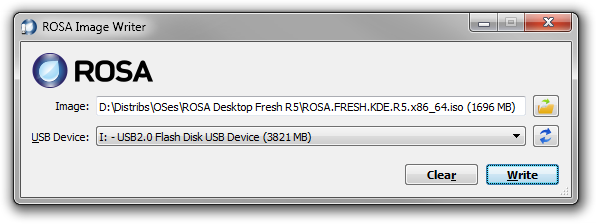
Download and execute RosaImageWriter with root permissions using sudo ./RosaImageWriter or in KDE, press on the execeutable.
Pre-Installation Notes
Section titled “Pre-Installation Notes”For the purpose of this guide, I will assume you are using ‘netctl’ for managing your wireless connection.
Now go ahead and install Arch.
If You Already Have Arch Installed
Section titled “If You Already Have Arch Installed”To follow this guide, you’ll need i3, rxvt-unicode and dmenu. Fire up your terminal and run sudo pacman -S i3 rxvt-unicode dmenu vim.
First Boot/Log-In
Section titled “First Boot/Log-In”If you installed a login manager, make sure to select i3 as the desktop environment. For example, the gnome login manager has a small settings/cog icon that lets you do so. If you didn’t install a graphical login manager, you’ll see what appears to be a fullscreen terminal. Enter your username and press enter, then do the same with your password. Once you are logged in, type startx and press enter to launch i3.
You will be prompted to select the windows or alt key as a modifier. The modifier key is used for controlling the window manager. After this, select yes to creating a config file.
Open the terminal by pressing mod+enter, then run sudo wifi-menu to create a wireless profile and remember its name. Then run sudo netctl enable <profile_name>. This automatically connects you to wifi on each boot. Now run reboot.
Screen Resolution
Section titled “Screen Resolution”Your screen resolution may be incorrect. Run xrandr and identify your display. Then run xrandr --output <source_name> --mode 2560x1440 --rate <refresh_rate> For me it is xrandr --output DP1-8 --mode 2560x1440 --rate 59.95. If you have multiple monitors, check out the documentation. The xrandr setting isn’t permanent for now, we’ll get to that later.
Guide Dependencies
Section titled “Guide Dependencies”Before we get to the ricing, we need to install a few things first.
Install Dmenu, Vim and Ranger
Section titled “Install Dmenu, Vim and Ranger”sudo pacman -S dmenu vim ranger
To use Dmenu, press mod+d. Only packages that have a GUI will appear if selected through Dmenu, otherwise it’ll seem as if it’s not working. This is normal.
To Use Ranger, run ranger.
Install Yay
Section titled “Install Yay”cd ~mkdir -p /tmp/yay_installcd /tmp/yay_install
sudo pacman -S base-devel
sudo pacman -S expac yajl git
git clone https://aur.archlinux.org/yay.gitcd yaymakepkg -si
cd ~rm -rf /tmp/yay_installInstall Pywal
Section titled “Install Pywal”Python 3.5 or above is required, so ensure it’s installed by running python -V. If it isn’t, install it: pacaur -S python.
When you’re good to go:
sudo pacman -S feh imagemagick python-pip python-pywalNote: You don’t need to view package build. If you decide to view it, it’ll be displayed in Vim. Type :q to exit Vim.

Right click on the image above and save as bg1.jpg. Now do the following:
cd ~mkdir -p ~/Pictures/Wal/mv ~/Downloads/bg1.jpg ~/Pictures/Wal/wal -i ~/Pictures/Wal/bg1.jpgInstall Polybar
Section titled “Install Polybar”First you’ll need to install the dependencies and then Polybar itself:
sudo pacman -S cairo libxcb python2 xcb-proto xcb-util-image xcb-util-wm xcb-util-xrm jsoncppyay -S polybar-gitInstall Dot Files
Section titled “Install Dot Files”cd ~git clone https://github.com/IbrahimButt/direwolf-arch-rice.gitcp -r ~/direwolf-arch-rice/.config/ ~/
cp -r ~/direwolf-arch-rice/.Xresources ~/xrdb .XresourcesYou will need to run wal -i ~/Pictures/Wal/bg1.jpg again here, so Urxvt uses the colorscheme.
Refresh i3 by pressing mod+r.
Only terminals and windows opened after this point will have those two changes applied to them.
Install Fonts
Section titled “Install Fonts”yay -S otf-overpass
Refresh i3 to load changes.
Make Changes To i3 Config
Section titled “Make Changes To i3 Config”Read through the whole config file and understand what’s happening. Change anything that’s necessary. The comments will give you hints as to what you may want to change. Do not skip this step. It’ll teach you how to use i3.
Preview Images In Ranger
Section titled “Preview Images In Ranger”Install w3m: sudo pacman -S w3m. Then run vim ~/.config/ranger/rc.conf. Read it and understand it. Lastly, run ranger --copy-config=scope.
Run ranger in the terminal and use arrows keys to navigate. Make your way to ~/Pictures/Wal/bg1.jpg and you should see a preview of it.
Neofetch System Info and Replace ASCII Logo With Image
Section titled “Neofetch System Info and Replace ASCII Logo With Image”neofetch --w3m --source ~/Pictures/Wal/bg1.jpg
To customise what is displayed when you run neofetch or the above command, comment in/out lines in ~/.config/neofetch/config.
Activate Polybar
Section titled “Activate Polybar” polybar bar
Go into ranger and type zh to display hidden files. Then go to ~/.config/polybar/launch.sh. Here you’ll have a preview of the file. Read it to understand what is happening each time you boot/refresh i3. On line 5, replace DPI-8 with the source name of your display connection from running xrandr.
Your set up should be identical to mines now.
Known Issues
Section titled “Known Issues”The xrandr setting needs to be set on each boot if you’re using startx. Therefore, I’ve added it as an exec_always in the i3 config. Refresh i3 to apply it on each boot. I’m currently in the process of figuring this out. If you have any other issues, feel free to raise it on here..
Shameless Plug
Section titled “Shameless Plug”See what I’m upto and my latest work, or say hello, on Twitter: @madebyibrahim