greymd/tmux-xpanes
{ "createdAt": "2017-02-10T12:29:32Z", "defaultBranch": "master", "description": "Awesome tmux-based terminal divider", "fullName": "greymd/tmux-xpanes", "homepage": "", "language": "Shell", "name": "tmux-xpanes", "pushedAt": "2025-02-22T12:55:51Z", "stargazersCount": 2051, "topics": [ "bash", "bash-script", "cli", "commands", "tmux", "tmux-plugins", "zsh-completions" ], "updatedAt": "2025-11-25T19:58:23Z", "url": "https://github.com/greymd/tmux-xpanes"}Ultimate terminal divider powered by tmux

![]()
![]()

Ping multiple hosts
Section titled “Ping multiple hosts”$ xpanes -c "ping {}" 192.168.0.{1..9}Connect to multiple hosts over SSH and start logging for each operation
Section titled “Connect to multiple hosts over SSH and start logging for each operation”$ xpanes --log=~/log --ssh user1@host1 user2@host2 user2@host3Monitor CPU, Memory, Load, Processes and Disk info every seconds
Section titled “Monitor CPU, Memory, Load, Processes and Disk info every seconds”$ xpanes -x -e "top" "vmstat 1" "watch -n 1 df"Log in to multiple EC2 instances with Session Manager
Section titled “Log in to multiple EC2 instances with Session Manager”$ xpanes -stc 'aws ssm start-session --target {}' i-abcdefg123 i-abcdefg456 i-abcdefg789Operate running Docker containers on the interactive screen
Section titled “Operate running Docker containers on the interactive screen”$ docker ps -q | xpanes -s -c "docker exec -it {} sh"Features
Section titled “Features”- Split tmux window into multiple panes
- Construct command lines & execute them on the panes
- Runnable from outside of tmux session
- Runnable from inside of tmux session
- Record operation log
- Flexible layout arrangement for panes
- Select layout presets
- Set columns or rows as you like
- Display pane title on each pane
- Generate command lines from standard input (Pipe mode)
Requirements
Section titled “Requirements”- Bash (version 3.2 or later)
- tmux (version 1.8 or later)
If you prefer older tmux versions (1.6 and 1.7), Use version v2.2.3.
Installation
Section titled “Installation”Please refer to wiki > Installation in further details. Here is the some examples for installing.
With Homebrew (for macOS users)
Section titled “With Homebrew (for macOS users)”$ brew install tmux-xpanesWith dnf (For Fedora users)
Section titled “With dnf (For Fedora users)”$ sudo dnf install xpanesWith dnf, from EPEL (For RHEL/CentOS 8+ users)
Section titled “With dnf, from EPEL (For RHEL/CentOS 8+ users)”$ sudo dnf install https://dl.fedoraproject.org/pub/epel/epel-release-latest-$(rpm --eval %rhel).noarch.rpm$ sudo dnf install xpanesWith yum, from EPEL (For RHEL/CentOS 7 users)
Section titled “With yum, from EPEL (For RHEL/CentOS 7 users)”$ sudo yum install https://dl.fedoraproject.org/pub/epel/epel-release-latest-$(rpm --eval %rhel).noarch.rpm$ sudo yum install xpanesWith apt (For Ubuntu users)
Section titled “With apt (For Ubuntu users)”# Install `add-apt-repository` command, if necessary.$ sudo apt install software-properties-common
$ sudo add-apt-repository ppa:greymd/tmux-xpanes$ sudo apt update$ sudo apt install tmux-xpanesWith dpkg (For Debian users)
Section titled “With dpkg (For Debian users)”Please install tmux manually. After that, download deb file from release page and install.
$ wget https://github.com/greymd/tmux-xpanes/releases/download/v4.2.0/tmux-xpanes_v4.2.0.deb$ sudo dpkg -i tmux-xpanes*.deb$ rm tmux-xpanes*.debWith Zsh plugin managers
Section titled “With Zsh plugin managers”Attention: With this way, please install tmux manually.
Add this line to ~/.zshrc for zplug.
Zsh-completion for xpanes is also available. See Wiki > Installation.
zplug "greymd/tmux-xpanes"Manual Installation
Section titled “Manual Installation”Attention: With this way, please install tmux manually.
# Download with wget$ wget https://raw.githubusercontent.com/greymd/tmux-xpanes/v4.2.0/bin/xpanes -O ./xpanes
# Put it under PATH and make it executable.$ sudo install -m 0755 xpanes /usr/local/bin/xpanesTwo commands xpanes and tmux-xpanes will be installed. They are actually same commands (tmux-xpanes is alias of xpanes). Use whichever you like.
Usage:  xpanes [OPTIONS] [argument ...]
Usage(Pipe mode):  command ... | xpanes [OPTIONS] [<command> ...]
OPTIONS:  -h,--help                    Display this help and exit.  -V,--version                 Output version information and exit.  -B <begin-command>           Run <begin-command> before processing <command> in each pane. Multiple options are allowed.  -c <command>                 Set <command> to be executed in each pane. Default is `echo {}`.  -d,--desync                  Make synchronize-panes option off in new window.  -e                           Execute given arguments as is. Same as `-c '{}'`  -I <repstr>                  Replacing one or more occurrences of <repstr> in command provided by -c or -B. Default is `{}`.  -C NUM,--cols=NUM            Number of columns of window layout.  -R NUM,--rows=NUM            Number of rows of window layout.  -l <layout>                  Set the preset of window layout. Recognized layout arguments are:                               t    tiled                               eh   even-horizontal                               ev   even-vertical                               mh   main-horizontal                               mv   main-vertical  -n <number>                  Set the maximum number of <argument> taken for each pane.  -r                           Create or reuse the existing panes.  -s                           Speedy mode: Run command without opening an interactive shell.  -ss                          Speedy mode AND close a pane automatically at the same time as process exiting.  -S <socket-path>             Set a full alternative path to the server socket.  -t                           Display each argument on the each pane's border as their title.  -x                           Create extra panes in the current active window.  --log[=<directory>]          Enable logging and store log files to ~/.cache/xpanes/logs or <directory>.  --log-format=<FORMAT>        Make name of log files follow <FORMAT>. Default is `[:ARG:].log.%Y-%m-%d_%H-%M-%S`.  --ssh                        Same as `-t -s -c 'ssh -o StrictHostKeyChecking=no {}'`.  --stay                       Do not switch to new window.  --bulk-cols=NUM1[,NUM2 ...]  Set number of columns on multiple rows (i.e, "2,2,2" represents 2 cols x 3 rows).  --interval=<seconds>         Set interval between each pane creation and each command execution.                               sleep(1) is used for the interval.  --debug                      Print debug message.
Getting Started
Section titled “Getting Started”Try this command line.
$ xpanes 1 2 3 4You will get the screen like this.
+-------------------------------+-------------------------------+ │$ echo 1 │$ echo 2 │ │1 │2 │ │ │ │ │ │ │ │ │ │ │ │ │ │ │ │ │ │ │ +-------------------------------+-------------------------------+ │$ echo 3 │$ echo 4 │ │3 │4 │ │ │ │ │ │ │ │ │ │ │ │ │ │ │ │ │ │ │ +-------------------------------+-------------------------------+You can split the window into multiple panes successfully, great!
As you can see, each argument of xpanes is re-assigned to echo’s argument.
Next, let’s close those panes.
Don’t worry if you are not familiar with key bindings of tmux.
Just type exit and “Enter” key to close the panes.
+-------------------------------+-------------------------------+ │$ exit │$ exit │ │ │ │ │ │ │ │ │ │ │ │ │ │ │ │ │ │ │ │ │ │ +-------------------------------+-------------------------------+ │$ exit │$ exit │ │ │ │ │ │ │ │ │ │ │ │ │ │ │ │ │ │ │ │ │ │ +-------------------------------+-------------------------------+As shown above, input from keyboard is synchronized within multiple panes by default.
Suppress input synchronization
Section titled “Suppress input synchronization”To disable the synchronization of keyboard input within panes, use -d (or --desync) option. The input is applied to only one of them. Set tmux synchronized-pane on to re-enable synchronization.
$ xpanes -d 1 2 3 4-c option and -I option
Section titled “-c option and -I option”-c option is one of the fundamental options of xpanes.
Its argument is used as a command to be executed.
For example, try this one.
$ xpanes -c 'seq {}' 1 2 3 4You will get the screen like this.
+-------------------------------+-------------------------------+ │$ seq 1 │$ seq 2 │ │1 │1 │ │ │2 │ │ │ │ │ │ │ │ │ │ │ │ │ │ │ │ +-------------------------------+-------------------------------+ │$ seq 3 │$ seq 4 │ │1 │1 │ │2 │2 │ │3 │3 │ │ │4 │ │ │ │ │ │ │ │ │ │ +-------------------------------+-------------------------------+seq command which generates sequential numbers is specified by -c.
As you can see, {} is replaced each arguments. This placeholder can be changed by -I option like this.
$ xpanes -I@ -c 'seq @' 1 2 3 4echo {} is used as the default placeholder when no command is specified by -c option.
Brace expansion provided by Bash or Zsh is very useful to generate sequential numbers or alphabetical characters.
# Same as $ xpanes 1 2 3 4$ xpanes {1..4}Behavior modes
Section titled “Behavior modes”It is good to know about the conditional behavior of xpanes before checking further usages.
[Normal mode1] Outside of tmux session
Section titled “[Normal mode1] Outside of tmux session”When the tmux is not open and xpanes is executed on the normal terminal, the xpanes’s behavior is as follows:
- It newly creates a tmux session and new window on the session.
- In addition, it separates the window into multiple panes.
- Finally, the session will be attached.
[Normal mode2] Inside of tmux session
Section titled “[Normal mode2] Inside of tmux session”When the tmux is already open and xpanes is executed on the existing tmux session, the command’s behavior is as follows:
- It newly creates a window on the existing active session.
- In addition, it separates the window into multiple panes.
- Finally, the window will be active.
You can use the -x option to create the panes in the current window.
You can use the -r option to create panes in the current window, or reuse the existing ones. It is useful if you want to rerun the same xpanes command over and over, e.g.:
xpanes -r -B ‘ssh host’ -c ‘program> {}’ server client
will open 2 new panes. When the host reboots, you can rerun the same command and the existing panes will be reused.
[Pipe mode] Inside of tmux session & Accepting standard input
Section titled “[Pipe mode] Inside of tmux session & Accepting standard input”When xpanes accepts standard input (i.e, xpanes follows another command and pipe |) under Normal mode2 , xpanes’s behavior is going to be the special one called “Pipe mode”.
It is documented in the [Pipe mode section]!(#pipe-mode).
Further Examples
Section titled “Further Examples”Monitor multiple files
Section titled “Monitor multiple files”$ xpanes -c "tail -f {}" /var/log/apache/{error,access}.log /var/log/application/{error,access}.logThe result is like this.
+------------------------------------------+------------------------------------------+ │$ tail -f /var/log/apache/error.log │$ tail -f /var/log/apache/access.log │ │ │ │ │ │ │ │ │ │ │ │ │ │ │ │ │ │ │ │ │ │ │ │ │ │ │ │ +------------------------------------------+------------------------------------------+ │$ tail -f /var/log/application/error.log │$ tail -f /var/log/application/access.log │ │ │ │ │ │ │ │ │ │ │ │ │ │ │ │ │ │ │ │ │ │ │ │ │ │ │ │ +------------------------------------------+------------------------------------------+Hmm? Do you want to monitor those files through the SSH? Just do it.
# 'ssh user@host' is added.$ xpanes -c "ssh user@host tail -f {}" \/var/log/apache/{error,access}.log \/var/log/application/{error,access}.logConnecting multiple hosts over SSH with same user
Section titled “Connecting multiple hosts over SSH with same user”$ xpanes -c "ssh myuser@{}" host1 host2 +-------------------------------+-------------------------------+ │$ ssh myuser@host1 │ $ ssh myuser@host2 │ │ │ │ │ │ │ │ │ │ │ │ │ │ │ │ │ │ │ │ │ │ │ │ │ │ │ │ │ │ │ │ │ │ │ │ │ +-------------------------------+-------------------------------+Use SSH with ignoring alert message
Section titled “Use SSH with ignoring alert message”--ssh option is helpful to ignore the alert message from OpenSSH. It is not required to answer yes/no question against it. Use it if you are fully sure that the connection is reliable one.
$ xpanes --ssh myuser1@host1 myuser2@host2This is same as below.
$ xpanes -t -s -c "ssh -o StrictHostKeyChecking=no {}" myuser1@host1 myuser2@host2-t and -s options are introduced later.
Connecting multiple hosts over SSH AND logging operations
Section titled “Connecting multiple hosts over SSH AND logging operations”$ xpanes --log=~/operation_log -c "ssh {}" user1@host1 user2@host2The result is like this.
+-------------------------------+-------------------------------+ │$ ssh user1@host1 │ $ ssh user2@host2 │ │ │ │ │ │ │ │ │ │ │ │ │ │ │ │ │ │ │ │ │ │ │ │ │ │ │ │ │ │ │ │ │ │ │ │ │ +-------------------------------+-------------------------------+In addition, log files will be created.
$ ls ~/operation_log/user1@host1-1.log.2017-03-15_21-30-07user2@host2-1.log.2017-03-15_21-30-07File name format for log file can be specified with --log-format option.
Please refer to [FORMAT]!(#format) for more information.
Attention: Logging feature does not work properly with particular tmux versions. Please refer to wiki > Known Bugs in further details.
Execute bash alias on multiple hosts via SSH
Section titled “Execute bash alias on multiple hosts via SSH”$ xpanes -c "ssh -t {} bash -ci 'll'" host-{1,2,3} +------------------------------------+-------------------------------------+ │$ ssh -t host-1 bash -ci ll │$ ssh -t host-2 bash -ci ll │ │total 1234 │total 1234 │ │drwxr-xr-x 38 user user ... ./ │drwxr-xr-x 38 user user ... ./ │ │drwxr-xr-x 6 root root ... ../ │drwxr-xr-x 6 root root ... ../ │ │... │... │ │ │ │ │ │ │ │ │ │ │ │ │ │------------------------------------+-------------------------------------│ │$ ssh -t host-3 bash -ci ll │ │total 1234 │ │drwxr-xr-x 38 user user ... ./ │ │drwxr-xr-x 6 root root ... ../ │ │... │ │ │ │ │ │ │ │ │ +------------------------------------+-------------------------------------+Run commands promptly
Section titled “Run commands promptly”-s option is useful if you have following issues.
- It takes long time to open the multiple new panes because default shell loads a bunch of configures (i.e
~/.zshrcloads something ). - If you do not want to leave commands on your shell history.
With -s option, xpanes does not create a new interactive shell.
Instead, a command is going to be executed as a direct child process of xpanes.
Here is the example.
$ xpanes -s -c "seq {}" 2 3 4 5As you can see, each pane starts from command’s result, not shell’s prompt like $ seq ....
+------------------------------------------+------------------------------------------+ │1 │1 │ │2 │2 │ │Pane is dead: Press [Enter] to exit... │3 │ │ │Pane is dead: Press [Enter] to exit... │ │ │ │ │ │ │ │ │ │ │ │ │ │ │ │ │ │ │ +------------------------------------------+------------------------------------------+ │1 │1 │ │2 │2 │ │3 │3 │ │4 │4 │ │Pane is dead: Press [Enter] to exit... │5 │ │ │Pane is dead: Press [Enter] to exit... │ │ │ │ │ │ │ │ │ │ │ │ │ +------------------------------------------+------------------------------------------+Confirmation message like “Pane is dead…” is displayed when every process ends.
To suppress the message, use -ss instead of -s.
Display host always
Section titled “Display host always”$ xpanes -t -c "ping {}" 192.168.1.{5..8}The result is like this.
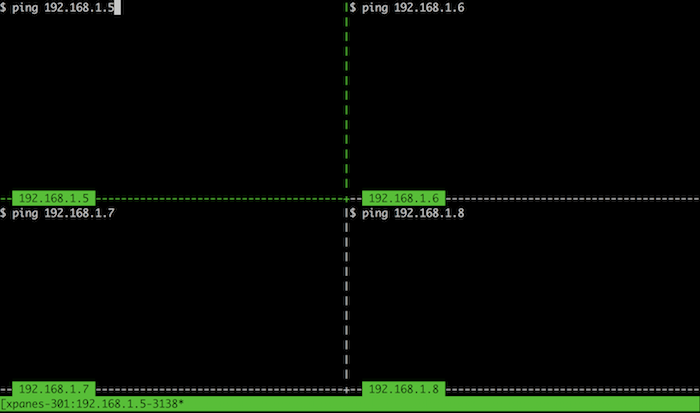
As you notice, -t displays each argument on the each pane border.
It is called “pane title”. The pane title is displayed with green background and black characters by default.
See [Environment variables]!(#shell-variables) section to change the default format.
Create new panes on existing window
Section titled “Create new panes on existing window”-x option creates extra panes to the window.
New window is not created then.
Here is the example xpanes is executed on the one of the three panes.
+-------------------------------+-------------------------------+ │$ │$ │ │ │ │ │ │ │ │ │ │ │ │ │ │ │ │ │ │ │ │ │ │ +-------------------------------+-------------------------------+ │ $ xpanes -x 4 5 6 │ │ │ │ │ │ │ │ │ │ │ │ │ │ │ +-------------------------------+-------------------------------+Additional three panes are created.
+-------------------------------+-------------------------------+ │$ │$ │ │ │ │ │ │ │ │ │ │ │ │ │ +-------------------------------+-------------------------------+ │$ xpanes -x 4 5 6 │$ echo 4 │ │$ │4 │ │ │$ │ │ │ │ │ │ │ +-------------------------------+-------------------------------+ │$ echo 5 │$ echo 6 │ │5 │6 │ │$ │$ │ │ │ │ │ │ │ +-------------------------------+-------------------------------+Execute different commands on the different panes
Section titled “Execute different commands on the different panes”-e option executes given argument as it is.
$ xpanes -e "top" "vmstat 1" "watch -n 1 free"Then the result will be like this.
+-------------------------------+------------------------------+ │$ top │$ vmstat 1 │ │ │ │ │ │ │ │ │ │ │ │ │ │ │ │ │ │ │ +-------------------------------+------------------------------+ │$ watch -n 1 free │ │ │ │ │ │ │ │ │ │ │ │ │ +--------------------------------------------------------------+You will get the same result with this command line.
$ xpanes -I@ -c "@" "top" "vmstat 1" "watch -n 1 free"Preprocessing for each pane
Section titled “Preprocessing for each pane”-B option allows to run another command before processing -c option.
$ xpanes -B 'echo Preprocessing' -c 'echo Test' _ +-------------------------------+ │$ echo Preprocessing │ │Preprocessing │ │$ echo Test │ │Test │ │ │ │ │ │ │ +-------------------------------+-B and -c are similar options.
However, -B can be used multiple times.
$ xpanes -B 'echo Pre1' -B 'echo Pre2' -B 'echo Pre3' -c 'echo {}' A B C D +-------------------------------+------------------------------+ │$ echo Pre1 │$ echo Pre1 │ │Pre1 │Pre1 │ │$ echo Pre2 │$ echo Pre2 │ │Pre2 │Pre2 │ │$ echo Pre3 │$ echo Pre3 │ │Pre3 │Pre3 │ │$ echo A │$ echo B │ +-------------------------------+------------------------------+ │$ echo Pre1 │$ echo Pre1 │ │Pre1 │Pre1 │ │$ echo Pre2 │$ echo Pre2 │ │Pre2 │Pre2 │ │$ echo Pre3 │$ echo Pre3 │ │Pre3 │Pre3 │ │$ echo C │$ echo D │ +-------------------------------+------------------------------+It is helpful to customize default xpanes behavior with alias.
See [Use alias]!(#use-alias).
Layout of panes
Section titled “Layout of panes”Columns and rows
Section titled “Columns and rows”-C and -R options are useful to change tha layout of panes.
A number of columns can be specified by -C (or --cols) option.
Here is the example that panes are organized in 2 columns.
$ xpanes -C 2 AAA BBB CCC DDD EEE FFF GGG HHH IIIThe result is like this.
+------------------------------+------------------------------+ │$ echo AAA │$ echo BBB │ │ │ │ │ │ │ +------------------------------+------------------------------+ │$ echo CCC │$ echo DDD │ │ │ │ │ │ │ +------------------------------+------------------------------+ │$ echo EEE │$ echo FFF │ │ │ │ │ │ │ +------------------------------+------------------------------+ │$ echo GGG │$ echo HHH │ │ │ │ │ │ │ +------------------------------+------------------------------+As you may expect, -R (or --rows) option can fix the number of rows.
$ xpanes -R 5 AAA BBB CCC DDD EEE FFF GGG HHHPanes are organized in 5 rows.
+------------------------------+------------------------------+ │$ echo AAA │$ echo BBB │ │ │ │ +------------------------------+------------------------------+ │$ echo CCC │$ echo DDD │ │ │ │ +------------------------------+------------------------------+ │$ echo EEE │$ echo FFF │ │ │ │ +------------------------------+------------------------------+ │$ echo GGG │ │ │ +-------------------------------------------------------------+ │$ echo HHH │ │ │ +-------------------------------------------------------------+Even if the number of arguments is not multiple of provided number, the number of panes on each row is adjusted to be as close as possible.
Set columns in bulk
Section titled “Set columns in bulk”--bulk-cols accepts comma-separated numbers.
Each number is corresponding to the number of columns of each row.
$ xpanes --bulk-cols=1,3,1,2,5 {A..L}Here is the result.
+-------------------------------------------------------------+ │$ echo A │ │ │ +-------------------------------------------------------------+ │$ echo B │$ echo C │$ echo D │ │ │ │ │ +-------------------------------------------------------------+ │$ echo E │ │ │ +-------------------------------------------------------------+ │$ echo F │$ echo G │ │ │ │ +-------------------------------------------------------------+ │$ echo H │$ echo I │$ echo J │$ echo K │$ echo L │ │ │ │ │ │ │ +-------------------------------------------------------------+The number of argument must equal to the sum of the comma-separated numbers.
In this example, the sum of the numbers of --bulk-cols is 12 (1 + 3 + 1 + 2 + 5 = 12) because there are 12 characters from A to L.
Layout presets
Section titled “Layout presets”-l option is also useful to change the layout of panes.
For example, to line up panes vertically, put ev (it is corresponding to even-vertical in tmux manual) followed by -l.
$ xpanes -l ev -c "{}" "top" "vmstat 1" "watch -n 1 df"It would be like this.
+-------------------------------------------------------------+ │$ top │ │ │ │ │ │ │ │ │ +-------------------------------------------------------------+ │$ vmstat 1 │ │ │ │ │ │ │ │ │ +-------------------------------------------------------------+ │$ watch -n 1 df │ │ │ │ │ │ │ │ │ +-------------------------------------------------------------+With same way, eh (even-horizontal), mv(main-vertical) and mh(main-horizontal) are available. Please refer to xpanes --help also.
Pipe mode
Section titled “Pipe mode”Pipe mode is activated when xpanes command is accepting standard input.
With this mode, xpanes behaves like UNIX xargs.
# Pipe mode$ seq 3 | xpanesWith this command line, the output would be like this.
+------------------------------+------------------------------+ │$ echo 1 │$ echo 2 │ │1 │2 │ │ │ │ │ │ │ │ │ │ │ │ │ │ │ │ │ │ │ +------------------------------+------------------------------+ │$ echo 3 │ │3 │ │ │ │ │ │ │ │ │ │ │ │ │ +------------------------------+------------------------------+Pipe mode has two features.
xpanes’s argument will be the common command line which will be used within all panes (this is same as the-coption’s argument in Normal mode).- Each line provided by standard input is corresponding to the each pane’s command line (this is corresponding to normal argument of
xpanesin Normal mode).
# The command line generates some numbers.$ seq 41234
# Add those numbers to xpanes command.$ seq 4 | xpanes seq
The result will be like this.
+-------------------------------+------------------------------+ │$ seq 1 │$ seq 2 │ │ │ │ │ │ │ │ │ │ │ │ │ │ │ │ │ │ │ │ │ │ +-------------------------------+------------------------------+ │$ seq 3 │$ seq 4 │ │ │ │ │ │ │ │ │ │ │ │ │ │ │ │ │ │ │ │ │ │ +-------------------------------+------------------------------+Of course, -c and -I options are available.
$ seq 4 | xpanes -c 'seq {}'## xpanes seq## and## xpanes -c 'seq {}'## are same.However, giving both -c and any arguments causes error. Because the command cannot decide which argument should be used.
$ echo test | xpanes -c 'echo {}' echoxpanes:Error: Both arguments and other options (like '-c', '-e') which updates <command> are given.Connecting to multiple hosts given by ~/.ssh/config
Section titled “Connecting to multiple hosts given by ~/.ssh/config”Pipe mode allows you to make combinations between tmux and other general UNIX commands.
For example, let’s prepare ~/.ssh/config file like this.
Host host1    User user1    HostName 192.168.0.2    IdentityFile ~/.ssh/id_rsa
Host host2    User user2    HostName 192.168.0.3    IdentityFile ~/.ssh/id_rsa
Host host3    User user3    HostName 192.168.0.4    IdentityFile ~/.ssh/id_rsa
Parse host name with general UNIX commands.
$ cat ~/.ssh/config | awk '$1=="Host"{print $2}'host1host2host3Giving the results to xpanes ssh command.
$ cat ~/.ssh/config | awk '$1=="Host"{print $2}' | xpanes sshThe results would be like this.
+------------------------------+------------------------------+ │$ ssh host1 │$ ssh host2 │ │ │ │ │ │ │ │ │ │ │ │ │ │ │ │ │ │ │ │ │ │ +------------------------------+------------------------------+ │$ ssh host3 │ │ │ │ │ │ │ │ │ │ │ │ │ │ │ +------------------------------+------------------------------+Operate session
Section titled “Operate session”Recover disconnected session
Section titled “Recover disconnected session”You may restore the tmux session created by xpanes even if it is unexpectedly disconnected from your terminal.
xpanes creates ~/.cache/xpanes/socket.<PID> file as socket file by default.
Try to find socket file like this.
$ ls ~/.cache/xpanes/socket.*/home/user/.cache/xpanes/socket.1234If you find any socket files, try to attach it. The session might be recovered.
$ tmux -S /home/user/.cache/xpanes/socket.1234 attachShare terminal sessions with others
Section titled “Share terminal sessions with others”You can specify the socket file name with -S option.
Importing this socket file, different users can share their screens each other.
- user1
[user1@host] $ xpanes -S /home/user1/mysocket a b c d ...- user2
[user2@host] $ tmux -S /home/user1/mysocket attach… then, user1 and user2 can share their screen.
FORMAT
Section titled “FORMAT”File name of log file generated by --log option can be changed by --log-format=FORMAT.
Default value of FORMAT is [:ARG:].log.%Y-%m-%d_%H-%M-%S.
Interpreted sequences are:
[:PID:]— Process id of the tmux session[:ARG:]— Argument name
In addition, sequences same as date(1) are available.
For example:
%Y— year (e.g, 1960)%m— month (e.g, 01)%d— date (e.g, 31)
And etc.
Other sequences are also available.
Refer to date(1) manual.
Use alias
Section titled “Use alias”Get index number
Section titled “Get index number”As mentioned before, -B option is helpful to improve your xpanes with alias.
For example, define the alias like this.
Alias:
_tmp='INDEX=`tmux display -pt "${TMUX_PANE}" "#{pane_index}"`'alias xpanes="xpanes -B '${_tmp}'"After that, execute this command.
$ xpanes -sc 'echo $INDEX' _ _ _ _ +-------------------------------+------------------------------+ │$ echo $INDEX │$ echo $INDEX │ │0 │1 │ │ │ │ │ │ │ │ │ │ │ │ │ │ │ │ +-------------------------------+------------------------------+ │$ echo $INDEX │$ echo $INDEX │ │2 │3 │ │ │ │ │ │ │ │ │ │ │ │ │ │ │ │ +-------------------------------+------------------------------+As shown above, $INDEX has the index number of pane.
This technique is helpful to avoid that all the commands start simultaneously.
To wait each command start every second, just do it with the above alias.
$ xpanes -B 'sleep $INDEX' -c 'command {}' argA argB argC ...See wiki > Alias examples for more useful examples.
Shell variables
Section titled “Shell variables”xpanes refers to following shell variables.
Add the statement to your default shell’s
startup file file (i.e .bashrc, .zshrc) to change them as you like.
XDG_CACHE_HOME
Section titled “XDG_CACHE_HOME”tmux-xpanes follows XDG Base Directory Specification.
XDG_CACHE_HOME is $HOME/.cache by default.
Therefore, $HOME/.cache/xpanes directory is used to store temporary data by default.
TMUX_XPANES_EXEC
Section titled “TMUX_XPANES_EXEC”DEFAULT VALUE: tmux
It is preferentially used as a internal tmux command.
It is helpful if you want to use specific tmux version for xpanes, or enable specific options always.
Example:
export TMUX_XPANES_EXEC="/usr/local/bin/tmux1.8 -2"# => xpanes command calls "/usr/local/bin/tmux1.8 -2" internally.TMUX_XPANES_LOG_DIRECTORY
Section titled “TMUX_XPANES_LOG_DIRECTORY”DEFAULT VALUE: $HOME/.cache/xpanes/logs
Path to store log files generated by --log option.
It is ignored if the path is explicitly given by --log=.
TMUX_XPANES_LOG_FORMAT
Section titled “TMUX_XPANES_LOG_FORMAT”DEFAULT VALUE: [:ARG:].log.%Y-%m-%d_%H-%M-%S
Format of the log file name generated by --log option.
It is ignored if the format is explicitly given by --log-format=.
Example:
export TMUX_XPANES_LOG_FORMAT="[:ARG:]_mylog.log"TMUX_XPANES_PANE_BORDER_FORMAT
Section titled “TMUX_XPANES_PANE_BORDER_FORMAT”DEFAULT VALUE: #[bg=green,fg=black] #T #[default]
It defines format of the pane’s title.
See FORMATS section in man of tmux for further details.
It overwrites tmux’s pane-border-format in the xpanes’s session.
There are some examples here.
TMUX_XPANES_PANE_BORDER_STATUS
Section titled “TMUX_XPANES_PANE_BORDER_STATUS”DEFAULT VALUE: bottom
It defines location of the pane’s title.
It overwrites tmux’s pane-border-status in the xpanes’s session.
Example:
# Change value from bottom to topexport TMUX_XPANES_PANE_BORDER_STATUS="top"TMUX_XPANES_PANE_DEAD_MESSAGE
Section titled “TMUX_XPANES_PANE_DEAD_MESSAGE”DEFAULT VALUE: \033[41m\033[4m\033[30m Pane is dead: Press [Enter] to exit... \033[0m\033[39m\033[49m
It defines the message that displayed when a process exits with -s option enabled.
The message is underlined black character on the red background (see Ansi escape codes) by default.
Example:
## Set green colorexport TMUX_XPANES_PANE_DEAD_MESSAGE='\033[32m=== EXIT ==='TMUX_XPANES_TMUX_VERSION
Section titled “TMUX_XPANES_TMUX_VERSION”DEFAULT VALUE: empty
It forces the tmux version recognized by xpanes.
It is mainly used for testing purposes.
It is also useful if you are using a newer tmux that has not been released yet, or if you have customized the tmux itself and want to suppress unwanted warning messages from xpanes.
Example:
$ tmux -Vtmux customized-3.3$ xpanes 1 2 3xpanes:Warning: 'xpanes' may not work correctly! ......$ export TMUX_XPANES_TMUX_VERSION=1.8$ xpanes 1 2 3=> It works without warning messages.
Contributing
Section titled “Contributing”Please check out the [CONTRIBUTING]!(CONTRIBUTING.md) about how to proceed.
Testing
Section titled “Testing”Please note the following points before running the test.
- Run it from outside of tmux session
- Set
allow-renameoption off
Follow this.
## Clone repository together with shunit2 (kward/shunit2)$ git clone --recursive https://github.com/greymd/tmux-xpanes.git$ cd tmux-xpanes
## Suppress window name change$ echo 'set-window-option -g allow-rename off' >> ~/.tmux.conf$ echo 'set-window-option -g automatic-rename off' >> ~/.tmux.conf
## Run smoke test$ bash test/cases_smoke.sh
## => Testing will start ...
License
Section titled “License”Source code
Section titled “Source code”The scripts is available as open source under the terms of the MIT License.

The logo of tmux-xpanes is licensed under a Creative Commons Attribution-NonCommercial 4.0 International License.